Pages

Wednesday, 31 October 2018

Eco Printing

For a long time now I have been wanting to have a go at eco printing and dyeing and have read loads of posts online as well as purchasing the odd book or two but there's always been something putting me off as it is something completely new to me.

Then in the very first WOW book there was a workshop from Caroline Bell which was so easy to follow I knew I must have a go.

The first thing it required was some iron (or ferrous sulphate) water and as I still have several rusty bits of iron left from the time I was creating rusty textiles, I knew it had to be done.   I put rusty nails and other smaller bits of rusty iron into a jam jar with half and half water and white vinegar and then left them for several weeks.  I gave the jar an odd shake when I thought about it but don't think it is really necessary.

The leaves I used came from around and about, including some wonderful acer leaves from my sister's garden and it was finding these that really pushed me on with the experiment.

Following Caroline's instructions, I layered up abaca tissue and khadi paper with iron water and leaves, clamped them between two tiles and boiled them for 30 minutes.   Because my tiles were only half covered by the water, I did flip them over after the 30 minutes and did the second side for another 30 minutes. (Must look out for a bigger saucepan!)

The Acer leaves on khadi paper

Other leaves on abaca tissue

Other leaves on abaca tissue

Other leaves on abaca tissue

My initial feelings about the results were a bit mixed.  The acer leaves which I used on the khadi paper were really good but the other leaves - mainly oak, birch and sycamore - on the tissue were very black and on first sight, not very appealing.

I wondered whether the iron water was too strong and needed to be diluted a bit; also whether I'd used too much; or it could have been that I boiled them for too long.  These are all options I will explore the next time round.

I haven't finished working through Caroline's workshop as I wanted time to think before going on.  I posted these photos on the WOW Book Facebook group and received lots of positive and encouraging comments, including many suggestions that they looked as though they should be made into books.

When I have made more progress with them I will let you see what I've done.


October Update

By the skin of my teeth, I have finally got round to a few updates of crafty makes in October.

First, I made a few additions to my Autumn display - conkers and a pumpkin!  The conkers were from a pattern by Coastal Crochet, one of my favourite designers.  You will have seen more of her designs on here in the past.  The pumpkin was a pattern on Pinterest which sadly did not credit anyone.


So the finished display now looks like this.


With only one more month to go I have been thinking about my winter display which will of course give way to Christmas later in December.

So far I have made a cross stitch snowflake for the winter display and have a few more ideas which also involve snowflakes and snowmen.  I'm finding it hard to come up with ideas for winter that don't end up looking more like Christmas.


And for the Christmas display I've made this redwork embroidery using a colouring design found on Pinterest.


Monday, 29 October 2018

October Journal Quilt

Had a busy few weeks with many things getting in the way of me creating and keeping up to date!

I did manage to get my October Journal Quilt made but somehow never got around to posting about it so now is my chance to do so.

October meant that I had reached the blue/violet section on the colour wheel so for this I decided to do a log cabin that had a chequered effect.  I didn't really think it through to0 much so although I can promise you that the construction was very much a log cabin, the end result doesn't really look like it!


I free machine quilted the flower design using stitch and tear as I was frightened of not having an all over pattern.  It worked very well until I had to remove the paper and found that at the centres of the flowers the stitching was too dense to completely remove it.  Great learning curve for me and thank goodness it was on something that I don't plan to exhibit!

Only two more JQs to go for this year which has already got me thinking about what to do next year .....


Wednesday, 3 October 2018

Fabric Book


This is my latest creation, one I've been working on for some weeks but decided to wait until it was finished before I revealed it.

I've been drawn to hand made fabric books for some time so felt it was time I made one myself and as the sea and beaches play such a large part in in life, it was a no-brainer when it came to the subject.

So, what's inside .......


Starting with the sea, I layered various fabrics, lace and trimmings which were hand stitched to a background of indigo dyed fabric (fabric I have had for  over 25 years!).  I added some hand stitching including French knots, buttonhole stitch and straight stitch before oversewing around the edges.


For this seashells page, I starting by cutting my own rubber stamp with two different sized shells.  I've used shells in other pieces of work and have looked before for a rubber stamp but as I could never find one, I thought cutting my own would mean I'll have it to use in the future.

The shells were printed on to a piece of my own dyed  yellow fabric and the outlines were hand stitched with backstitch.   The text was printed on to tape and attached with running stitch.  Pieces of shell were added to finish before the edges were again oversewn.


I just love beach huts so they had to be included.   I always take photos of beach huts when I see them so this one, taken at Avon Beach, was printed on to fabric and applied to a background of blue and yellow fabric which I had dyed.   Simple straight stitches were added to the 'sand' to represent the grass that grows on the beach and a couple of seagulls were added to the sky.  Again, as with every page, the edges were oversewn.


No trip to the beach is complete without building a sandcastle!   We've made many when having a day on the beach with the grandchildren so they had to feature in this book.

This was quite simple - backstitched outlines on a piece of hand dyed fabric.


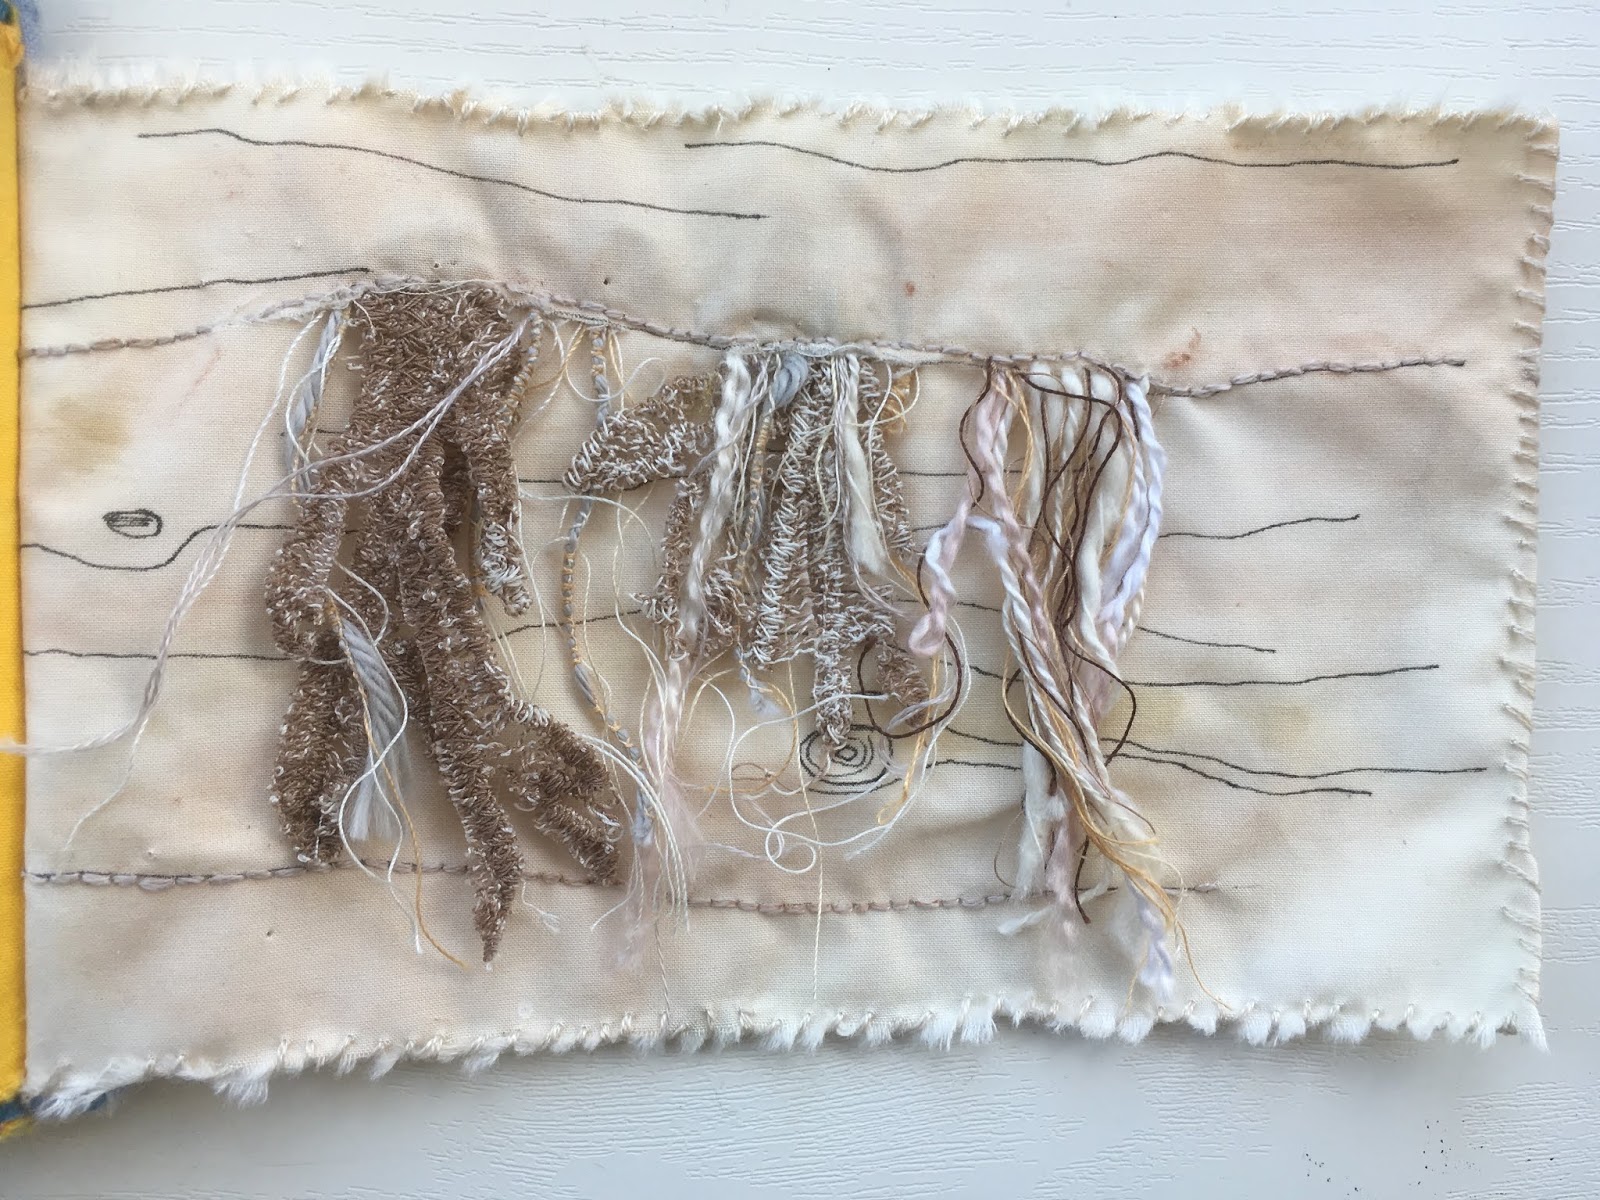
Some years ago, I took a photo of a wooden groyne at Littlehampton in which seaweed had become trapped and then been bleached by the sun.   At the time I was very taken with the image and felt sure there was something creative I could do with it and finally it's happened. 

I started with a piece of cream fabric which I coloured in various ways including paint and water soluble crayons and pencils and adding the timber grain lines with a drawing pen,   I wanted the colour to be quite subtle which is why it looks as though the fabric has not been coloured!

I created a piece of seaweed by machine embroidery on soluble fabric but as it was a bit stiff I cut in to it to roughen it up a bit.  This was stitched into a slit in the fabric along with various lengths of different threads.  A line of backstitch was added along the bottom for balance.


The final fishy page has the outline of a fish in stem stitch with lines of sequins had stitched in rows. Lines of backstitch and fly stitch added detail to the fins and tail and feather stitched was used for the seaweed.   The text was backstitch around the edge.

When I came to the cover I used up scraps and off cuts of blue and yellow fabric that I had used for the pages.  I used bondaweb to secure the pieces and then added running stitch and lines of straight stitch to secure some of the edges.   I put a piece of light fusible Vilene to give the cover a bit more weight and then buttonholed around the edge of the cover and lining.

The pages and cover were secured with stitching down the spine.


Hopefully this will be the first of many fabric books!

Sunday, 23 September 2018

Other creations this month

I was a bit late with my Journal Quilt this month.  It was done within September but for the past few years I have been ahead of myself so I felt quite guilty that it wasn't done until the middle of the month.

This month I reached the "blue" month so decided to have something linked to the sea for the gelli printing.   I've made my own print blocks with polystyrene in the past so used this method to create some texture on the plate inspired by waves and using fabric paints, printed some of my dyed blue fabric.  I used two or three different shades of blue fabric paint but once again I found that you don't get the same definition as you do when using acrylic paint.  The results were good though for the task in hand.


For the Log Cabin part of the quilt, I've again used the Courthouse Steps as the basis of the design with a bit of a twist.   For three of the sides I used different shades of my own dyed blue fabric and then the gelli printed fabric for the fourth side and the binding.

For the quilting I used a stitch on my machine which gives the appearance of waves going up and down.


It's time for a change of season so my thoughts turned to ideas for an Autumn hoop for my mantelpiece display.   I love the colours of Autumn - I always think it is because I was an Autumn baby!- so I knew it had to be something to reflect the colours.

My choice was a simple maple leaf (another favourite, particularly at Autumn) and luckily I found just the pattern I needed on the internet.  I've gone back to cross stitch after many years absence and as I enjoyed it so much, I think there will be more.  So therapeutic!


The display in coming together but I want to add some sort of foliage in a vase so am still thinking about that.   The other hoop and owls are from a Craftpod box I did last year when I began my seasonal project.


The garland of Autumn leaves is another pattern from Attic24 which I made using the ends of yarn left over from her Woodland Blanket which I made earlier this year.


Crochet Catch Up

I can't believe how long it is since my last post!  I have felt recently that life has been a bit lethargic and that I haven't had much to do in my creative world but looking back at what I've done since my last post, I have still managed to create quite a range of things.

I can always rely on my monthly Little Box of Crochet to give me something to do, sometimes not always something that I would have chosen myself but even that is a challenge in itself.  It's just over a year since I signed up and there has only been one month that still sits on my shelf unopened!

The July Box brought this "Sweet Summer Clutch Bag" designed by Sweet Sharna which was quite a quick make and one that I might well take on our next holiday.  Not sure I got the pattern 100% correct but it turned out okay and I'm happy with it.


In August the box had a lovely project book to keep a record of all my crochet makes which was lovely in itself, but there was also a pattern for a colourful cover to fit the book.   It was designed by Lucy of Attic24 - one of my favourite designers and one of the most generous designers I've come across.  I know I've mentioned her blog before - Attic24 - so if you haven't checked it out already, do so!

Now I've mentioned many times that my crochet tension is not what it should be which is the main reason I stick to shawls, scarves and anything that has to fit something, so I was a little worried that my book cover might not be the right size when I finished it.  But as you can see, it fitted perfectly.  This didn't stop my daughter commenting 'did you have to buy an A4 ring binder for it?' when I posted it on Instagram.


The postcard was also in the box which each month comes with several little extras!


One skein on wool that I've had since March, given to me on Mother's Day, has finally been created into a scarf.   The wool was from Fleabubsbylala -she hand dyes yarn and makes some wonderful crochet hooks and it is well worth checking out.

The wool was called Disco 2000 which is no doubt why my Pulp loving daughter bought it for me.  It was a riot of colour and as someone who has dyed fabric and threads many times I'd love to know how she got the colour change so often as it was no more than about 2" or 4" for each colour.

I also chose one of her own patterns as it only seemed right - it is called Harp Angel. 


Roll on the cold weather so I can wear it!

Tuesday, 28 August 2018

Granny Square Day 2018

It was Granny Square Day on the 15th August so it would have been churlish not to take part.


A bit different from the regular Granny Square - just wanted to try this out for future reference.

Also at the same time I made some more crochet covers for some pebbles which are now out in our garden among the gravel so it will be interesting to see how they weather.