The few weeks before Christmas found me with nothing to do so I found some wool I had bought a few months ago and made myself another virus shawl. It was once again a quick and easy make and filled in an empty slot!
As I have mentioned many times, I am not one to sit and do nothing! This is even at times like Christmas and the New Year when there are other things going on - if I am sitting, I have to be doing something!
Thankfully Little Box of Crochet and Craftpod both came to my rescue with projects to fill my time.
The December Little Box of Crochet was a Toft pattern for a delightful little dog. Not that I am particularly a dog lover or a fan of amigurami, but it kept me occupied!
Even I have to admit he's cute!
The Craftpod box had two 'makes', The first was an embroidered mistletoe sprig in a hoop which was joined by a felt fox.
I really enjoyed both of these makes and although I have resisted a subscription to Craftpod, I am usually tempted once I see what's on offer!
Pages
Showing posts with label embroidery. Show all posts
Tuesday, 8 January 2019
Saturday, 15 December 2018
End of another year
This is probably my last chance to post this year as I can already see how busy it is going to be between now and 2019, so it's time to update my creations of the last few weeks.
These are some of my favourites......
More Ecoprinting
I had another go at ecoprinting making a slight change to my first try by soaking the fabric and paper in the iron solution instead of painting it. I wanted to try 'cooking' it in the oven but was unable to find a brick to weigh it down so that will have to wait until next time.
I used a variety of leaves, flowers and onion skins with differing results. I must admit some of the leaves were very dry and crumbly and the flowers weren't exactly fresh so I feel there is still room for improvement.
I want to make some books with the printing I have done so far and hopefully my next exploration in eco printing will be with fresh leaves and plants and maybe using alum as the mordant.
Winter Display
For the Winter display I made a wreath, all be it a small one. I've always wanted to make a crochet wreath but just didn't have the time to do a full size one so thought this was the best option. Yet again I turned to Attich24 for my inspiration and guide, choosing two of her hellebore flowers for the decoration.
A little snowman also joined the display, along with some snowflakes hanging from a twig. I also stitched a snowflake in cross stitch to display in a hoop.
And put together .....
No sooner was the display up when Christmas preparations began and took over the mantelpiece.
The snowflakes stayed in place and the hoop was replaced with a crib scene worked in redwork plus all the lights and bits collected over the years.
Mandala Owl
The final stitch has been crossed on the Mandala Owl and although washed and pressed it hasn't been mounted yet. I can't decided whether to put it in a hoop or frame and it will probably end up being the one I can get most easily!
Really pleased with the end result so hope the little people like it too!
Beginnings of an eco home
I've long been aware of how much single use paper and plastic is used in our home and feel the time has come to do something about it.
My first change was to buy cotton fabric serviettes to save us buying paper ones this Christmas. Available at a most reasonable cost on Amazon, it seemed something much easier to do than I thought. With more planning I could have made them myself, and my intention is to make another set in a different colour at some stage.
I wanted to personalise them with some embroidery so used some small mandala designs I have in a book Mandalas to Embroider by Carina Envoldsen-Harris. I used a blue/grey palette of embroidery threads to match our décor which I feel have given a great result.
These are some of my favourites......
There are still creations in hand as well as those planned to get me through Christmas and into the New Year, so I will be back!
Wednesday, 31 October 2018
October Update
By the skin of my teeth, I have finally got round to a few updates of crafty makes in October.
First, I made a few additions to my Autumn display - conkers and a pumpkin! The conkers were from a pattern by Coastal Crochet, one of my favourite designers. You will have seen more of her designs on here in the past. The pumpkin was a pattern on Pinterest which sadly did not credit anyone.
So the finished display now looks like this.
With only one more month to go I have been thinking about my winter display which will of course give way to Christmas later in December.
So far I have made a cross stitch snowflake for the winter display and have a few more ideas which also involve snowflakes and snowmen. I'm finding it hard to come up with ideas for winter that don't end up looking more like Christmas.
And for the Christmas display I've made this redwork embroidery using a colouring design found on Pinterest.
First, I made a few additions to my Autumn display - conkers and a pumpkin! The conkers were from a pattern by Coastal Crochet, one of my favourite designers. You will have seen more of her designs on here in the past. The pumpkin was a pattern on Pinterest which sadly did not credit anyone.
So the finished display now looks like this.
With only one more month to go I have been thinking about my winter display which will of course give way to Christmas later in December.
So far I have made a cross stitch snowflake for the winter display and have a few more ideas which also involve snowflakes and snowmen. I'm finding it hard to come up with ideas for winter that don't end up looking more like Christmas.
And for the Christmas display I've made this redwork embroidery using a colouring design found on Pinterest.
Labels:
crochet,
cross stitch,
embroidery,
embroidery hoop,
hand stitching,
redwork,
seasons
Wednesday, 3 October 2018
Fabric Book
This is my latest creation, one I've been working on for some weeks but decided to wait until it was finished before I revealed it.
I've been drawn to hand made fabric books for some time so felt it was time I made one myself and as the sea and beaches play such a large part in in life, it was a no-brainer when it came to the subject.
So, what's inside .......
Starting with the sea, I layered various fabrics, lace and trimmings which were hand stitched to a background of indigo dyed fabric (fabric I have had for over 25 years!). I added some hand stitching including French knots, buttonhole stitch and straight stitch before oversewing around the edges.
For this seashells page, I starting by cutting my own rubber stamp with two different sized shells. I've used shells in other pieces of work and have looked before for a rubber stamp but as I could never find one, I thought cutting my own would mean I'll have it to use in the future.
The shells were printed on to a piece of my own dyed yellow fabric and the outlines were hand stitched with backstitch. The text was printed on to tape and attached with running stitch. Pieces of shell were added to finish before the edges were again oversewn.
I just love beach huts so they had to be included. I always take photos of beach huts when I see them so this one, taken at Avon Beach, was printed on to fabric and applied to a background of blue and yellow fabric which I had dyed. Simple straight stitches were added to the 'sand' to represent the grass that grows on the beach and a couple of seagulls were added to the sky. Again, as with every page, the edges were oversewn.
This was quite simple - backstitched outlines on a piece of hand dyed fabric.
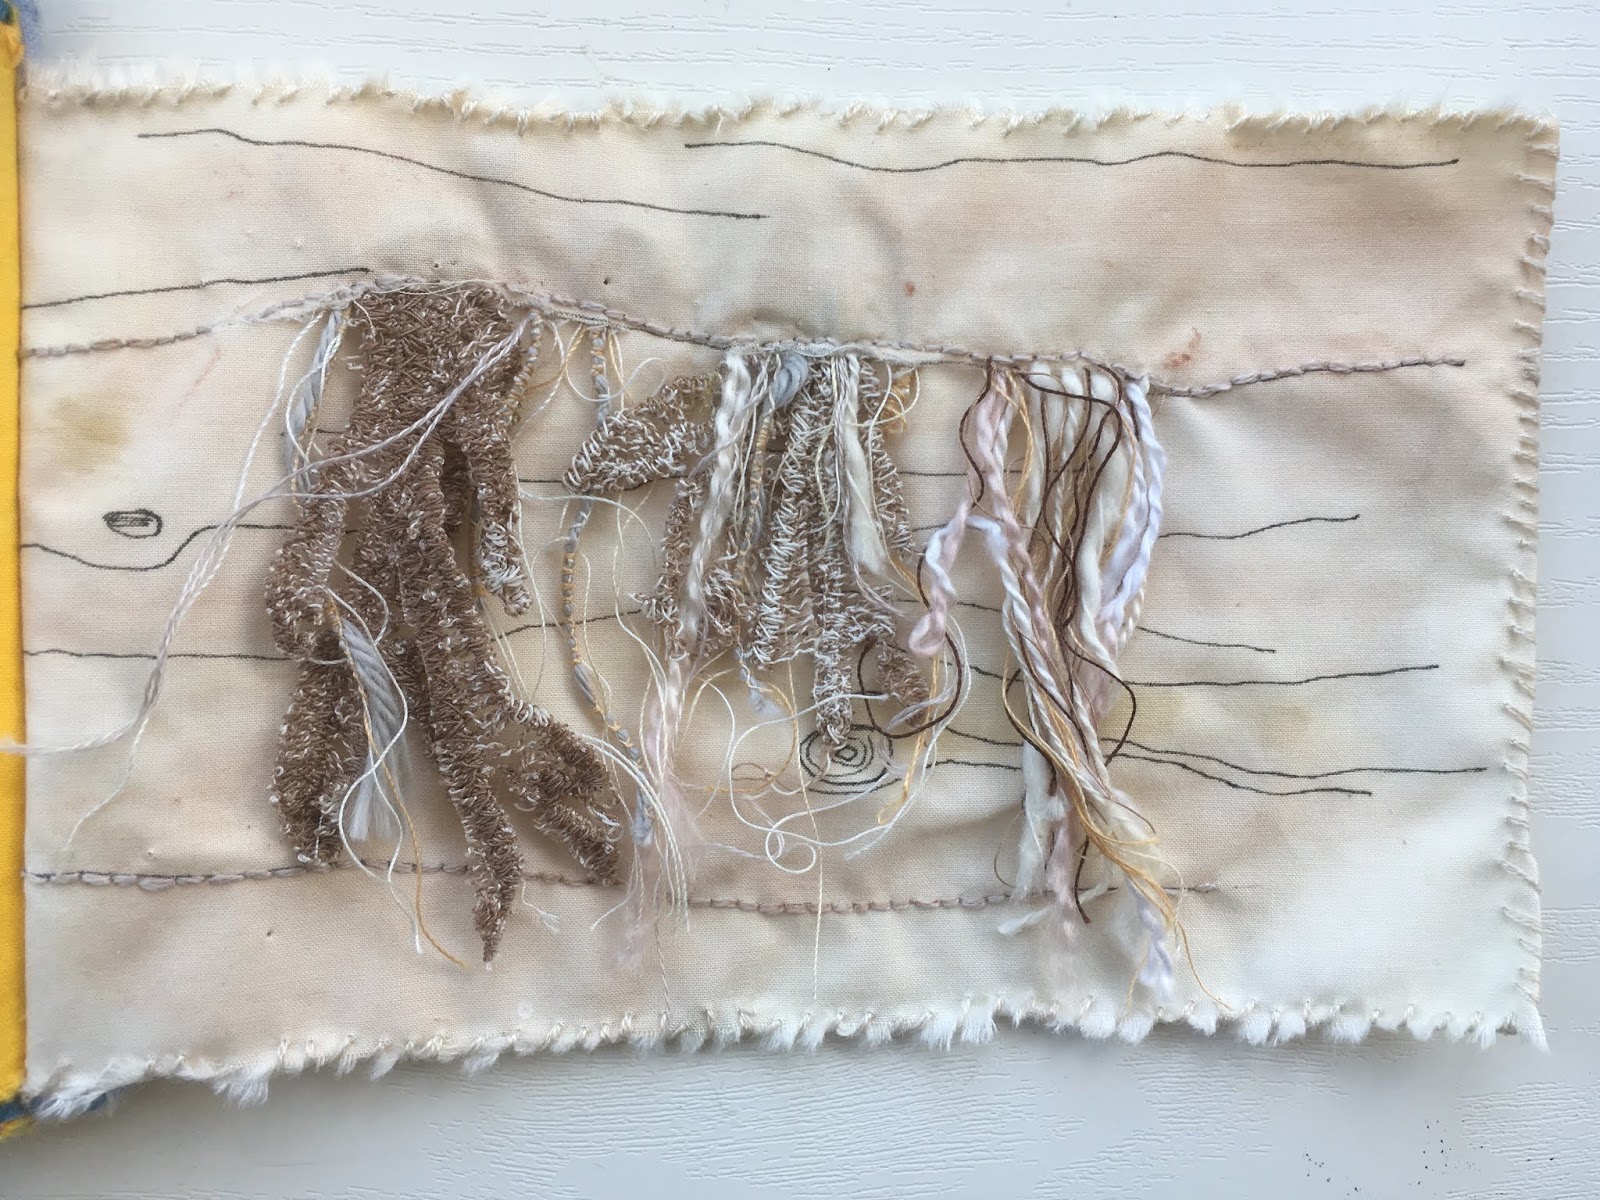
Some years ago, I took a photo of a wooden groyne at Littlehampton in which seaweed had become trapped and then been bleached by the sun. At the time I was very taken with the image and felt sure there was something creative I could do with it and finally it's happened.
I started with a piece of cream fabric which I coloured in various ways including paint and water soluble crayons and pencils and adding the timber grain lines with a drawing pen, I wanted the colour to be quite subtle which is why it looks as though the fabric has not been coloured!
I created a piece of seaweed by machine embroidery on soluble fabric but as it was a bit stiff I cut in to it to roughen it up a bit. This was stitched into a slit in the fabric along with various lengths of different threads. A line of backstitch was added along the bottom for balance.
The final fishy page has the outline of a fish in stem stitch with lines of sequins had stitched in rows. Lines of backstitch and fly stitch added detail to the fins and tail and feather stitched was used for the seaweed. The text was backstitch around the edge.
When I came to the cover I used up scraps and off cuts of blue and yellow fabric that I had used for the pages. I used bondaweb to secure the pieces and then added running stitch and lines of straight stitch to secure some of the edges. I put a piece of light fusible Vilene to give the cover a bit more weight and then buttonholed around the edge of the cover and lining.
The pages and cover were secured with stitching down the spine.
Hopefully this will be the first of many fabric books!
Tuesday, 28 August 2018
Denim Jacket completed!
The final panel on the back of my denim jacket is finished!
As I mentioned earlier this month, I let my four grandchildren design their own heart using images and words of the things they love and are important to them. They also got to choose their own colour scheme and I have to say they all made a great job of it. I only had to get creative fitting in all their designs in to the space.
And this what all the designs look like when put together - modelled by Hope.
I'm going to feel a bit bereft now it's finished so busy planning my next project!
As I mentioned earlier this month, I let my four grandchildren design their own heart using images and words of the things they love and are important to them. They also got to choose their own colour scheme and I have to say they all made a great job of it. I only had to get creative fitting in all their designs in to the space.
And this what all the designs look like when put together - modelled by Hope.
Labels:
denim jacket,
embroidery,
hand stitching,
stranded cotton
Saturday, 11 August 2018
Denim Jacket - The home run
I've added a small panel of stitching to my denim jacket which now leaves just one more to do.
The final panel is underway and is again inspired by one of the other loves of my life - my grandchildren.
I have decided to give the four of them design rights and will get each of them to decorate a heart with the things they like which I will embroider on to the jacket.
Mad or what?
I recently bought Joyful Stitching by Laura Wasilowski, a textile artist I have long admired, mainly through seeing her work in Quilting Arts Magazine. This book has really inspired me and is definitely freeing up my embroidery. I know I am a bit obsessed with everything being balanced and neat looking - it's a problem I have in all aspects of my creative work but I am (I think!) getting better.
Inspired by the stitching Laura has done in this book, I used some of her ideas to complete this little panel in my jacket.
The final panel is underway and is again inspired by one of the other loves of my life - my grandchildren.
I have decided to give the four of them design rights and will get each of them to decorate a heart with the things they like which I will embroider on to the jacket.
Mad or what?
Labels:
denim jacket,
embroidery,
hand stitching,
stranded cotton
Monday, 30 July 2018
And finally for this time ......
Another hoop of embroidery has joined my growing collection.
For some time, I have been wanting to do a piece of embroidery with a void, or negative space as some call it. We were away and my work on the denim jacket had come to an end so I had a go using a hand print as the negative space.
I was very limited in the threads that I had with me and loath to buy any more as I have found in the past that I always buy what I already have, I made use of what I had and went for a variegated blue look.
It was really an experiment and has evolved as I did it.
I used lazy daisy, straight stitch, crosses and French knots and started m
by working just under and inch all the way round the hand print. I started at the bottom with a variegated thread, changing for the middle third to a mid blue and then finally a light blue for the top third. When I had done this it looked a little odd so I evened out the shape but it looked more like a mitten with a hand inside it!
Once I was home I tried it in a hoop and decided that it really needed to have a circle of stitches around it and went for one smaller than the final hoop I mounted it in.
The jury is still out about this - maybe I've got it out of my system and will not repeat it but time will tell.
For some time, I have been wanting to do a piece of embroidery with a void, or negative space as some call it. We were away and my work on the denim jacket had come to an end so I had a go using a hand print as the negative space.
I was very limited in the threads that I had with me and loath to buy any more as I have found in the past that I always buy what I already have, I made use of what I had and went for a variegated blue look.
It was really an experiment and has evolved as I did it.
I used lazy daisy, straight stitch, crosses and French knots and started m
by working just under and inch all the way round the hand print. I started at the bottom with a variegated thread, changing for the middle third to a mid blue and then finally a light blue for the top third. When I had done this it looked a little odd so I evened out the shape but it looked more like a mitten with a hand inside it!
Once I was home I tried it in a hoop and decided that it really needed to have a circle of stitches around it and went for one smaller than the final hoop I mounted it in.
The jury is still out about this - maybe I've got it out of my system and will not repeat it but time will tell.
Further work on the denim jacket.....
I have been cracking on with the embroidery work on my denim jacket and I can see the end in sight.
The next panel to be completed is the bottom of the central panel and I decided to include beach huts as I just love them and always photograph any we see on our travels.
For the middle beach hut I used some of my own dyed fabric as it covers a seam and I thought would be easier than stitching over the seam. The other two are embroidered, the left hand one with stripes of satin stitch and a door of split stitch; and the right hand one has lines of running stitch using a variegated thread and a heart on the door which was again satin stitch. The beach around the huts was a combination of straight stitch, French knots and cross stitch and the sea was wavy lines of back stitch. The two fish were done using a variety of stitches including fly stitch, French knots and straight stitches, all outlined with chain stitch.
The bunting was worked in satin stitch on a line of back stitch.
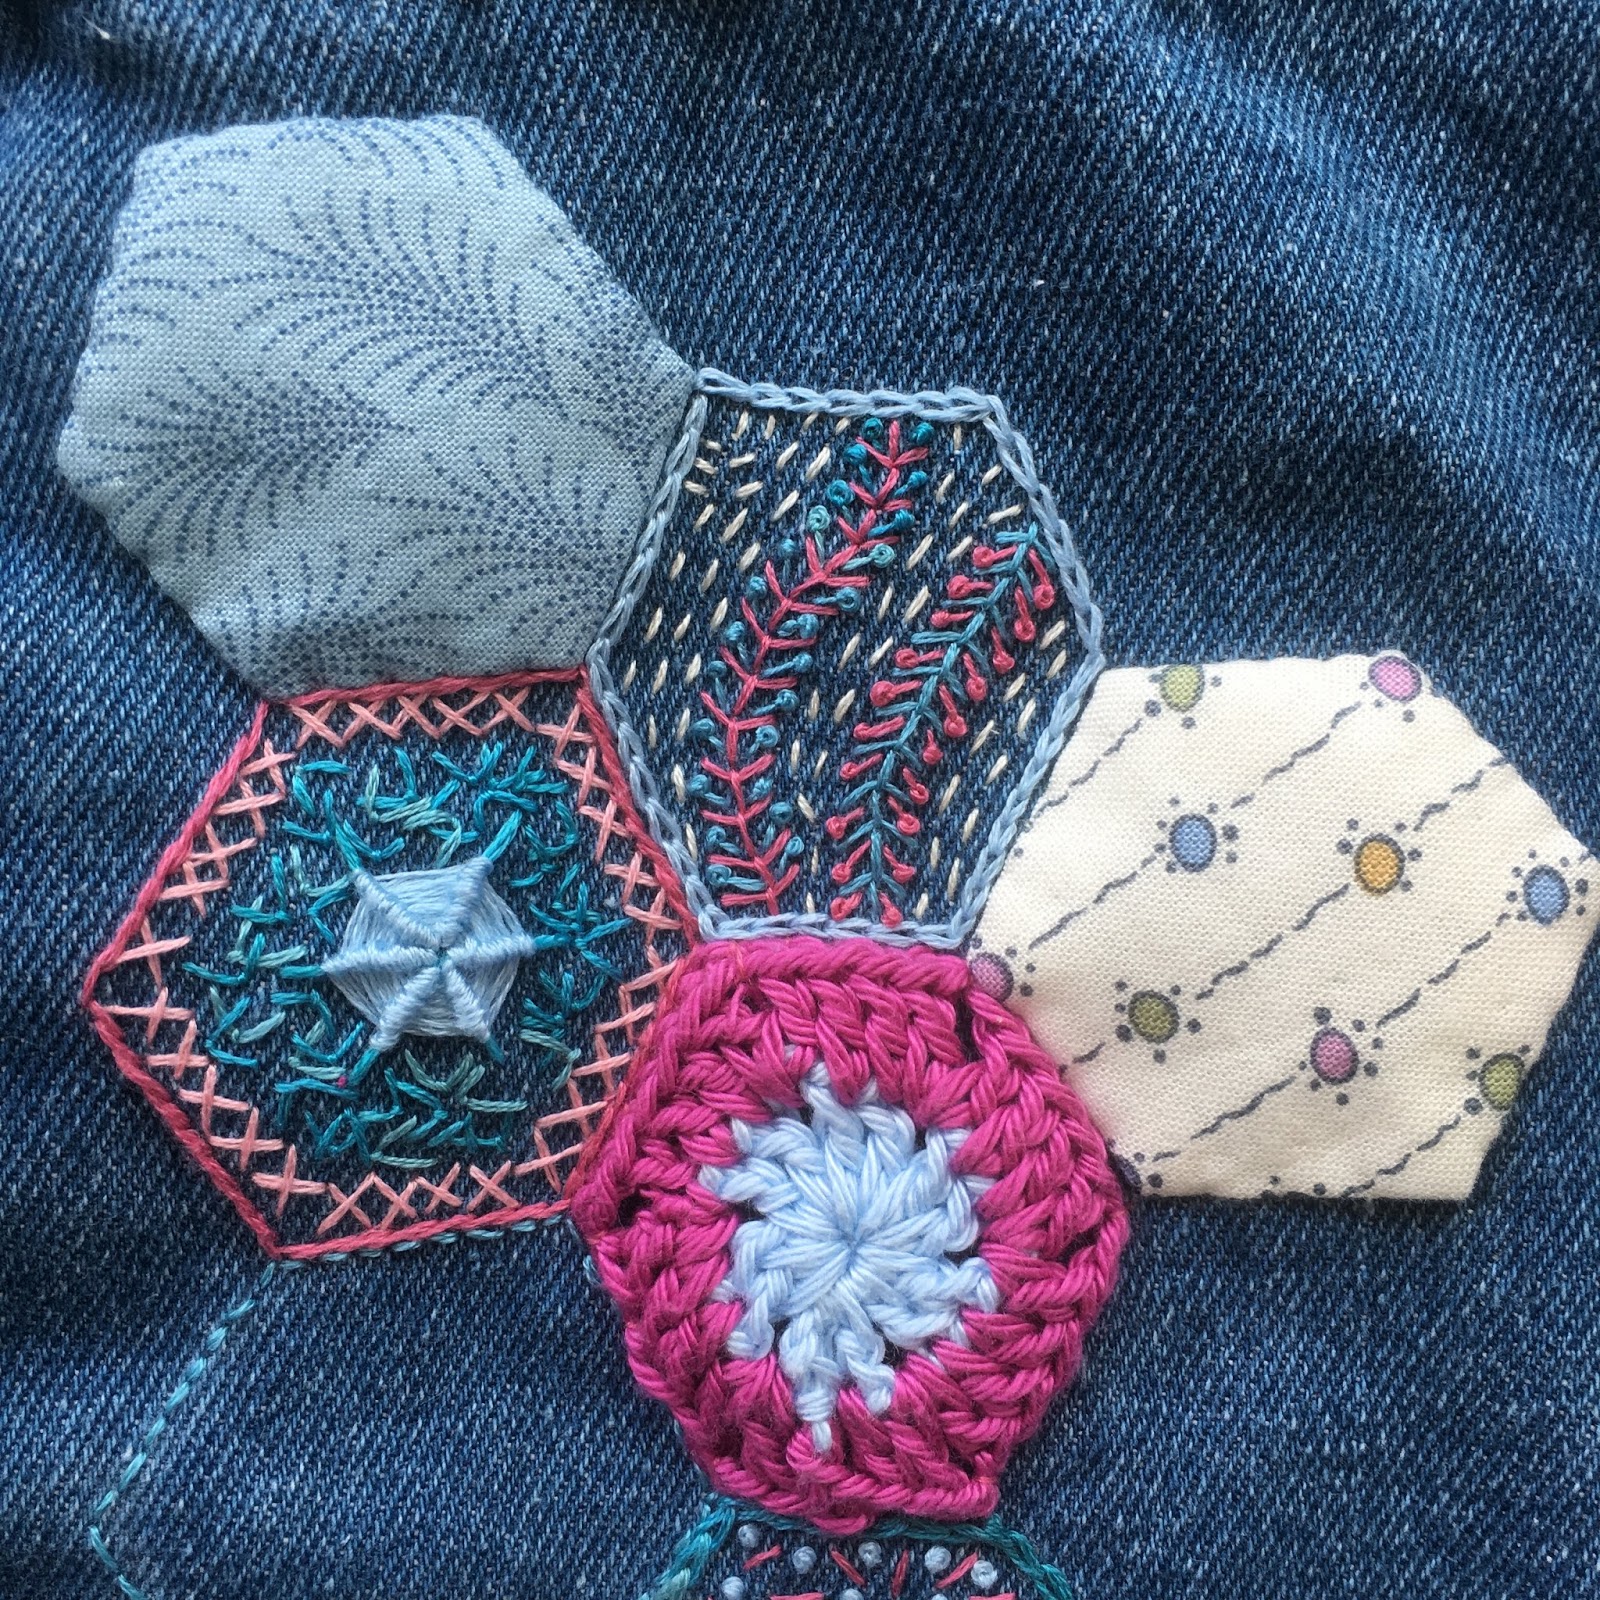
The next panel I worked on again reflects more important things in my life - stitching, crochet and patchwork.
As you can see some hexagons were using English Paper Piecing method, some were crocheted and the rest were embroidered.
Stitches used on the embroidered ones above include cross stitch, fly stitch, woven wheel, outlined with stem stitch; and running stitch, fern stitch, and pistol stitch, outlined with chain stitch.
In this next one I used straight stitches, French knots and satin stitch, outlined with chain stitch.
And for the final two, lazy daisy, fly stitch and ermine stitch, outlined with blanket stitch; and blanket stitch, French knots and straight stitch, outlined with back stitch.
I have an idea what I'm going to do for the final panel but it involves input from my grandchildren so it won't be done until the end of August.
The next panel to be completed is the bottom of the central panel and I decided to include beach huts as I just love them and always photograph any we see on our travels.
For the middle beach hut I used some of my own dyed fabric as it covers a seam and I thought would be easier than stitching over the seam. The other two are embroidered, the left hand one with stripes of satin stitch and a door of split stitch; and the right hand one has lines of running stitch using a variegated thread and a heart on the door which was again satin stitch. The beach around the huts was a combination of straight stitch, French knots and cross stitch and the sea was wavy lines of back stitch. The two fish were done using a variety of stitches including fly stitch, French knots and straight stitches, all outlined with chain stitch.
The bunting was worked in satin stitch on a line of back stitch.
The next panel I worked on again reflects more important things in my life - stitching, crochet and patchwork.
As you can see some hexagons were using English Paper Piecing method, some were crocheted and the rest were embroidered.
Stitches used on the embroidered ones above include cross stitch, fly stitch, woven wheel, outlined with stem stitch; and running stitch, fern stitch, and pistol stitch, outlined with chain stitch.
In this next one I used straight stitches, French knots and satin stitch, outlined with chain stitch.
And for the final two, lazy daisy, fly stitch and ermine stitch, outlined with blanket stitch; and blanket stitch, French knots and straight stitch, outlined with back stitch.
I have an idea what I'm going to do for the final panel but it involves input from my grandchildren so it won't be done until the end of August.
Labels:
beach huts,
crochet,
denim jacket,
embroidery,
hand stitching,
patchwork,
stranded cotton
Friday, 6 July 2018
Embroidered Dandelions
My love for embroidery still continues and for the past few weeks I've been working on a series of embroidered hoops based on a dandelion design.
The first one was inspired by a wooden block I have which features a dandelion clock. The ends look just like fly stitches so I felt it cried out to be an embroidery. I decided to do this on a navy blue background so I could use cream thread so the seed head looked more realistic.
I then moved on to design number two which incorporated fabric in a side panel and one of the dandelion heads. I chose yellow to reflect the yellow of the dandelion flower.
For this seed head I used French knots at the end of a long stitch. I did try it with pistol stitch but I wasn't pleased with the result and felt the French knots looked better.
For the final design I printed some of my dyed fabric with the wooden block that had inspired me. I used discharge paste so the design is quite subtle. Circles of the fabric were bonded to the background (I used misty fuse to keep it soft) and then secured with buttonhole around the edge. I used French knots again for the 'seeds' around the circle and used a few long stitches to give the impression of the stalks. The stems were whipped backstitch.
I've loved doing all three of these designs and have a head full of more!
The first one was inspired by a wooden block I have which features a dandelion clock. The ends look just like fly stitches so I felt it cried out to be an embroidery. I decided to do this on a navy blue background so I could use cream thread so the seed head looked more realistic.
I then moved on to design number two which incorporated fabric in a side panel and one of the dandelion heads. I chose yellow to reflect the yellow of the dandelion flower.
For this seed head I used French knots at the end of a long stitch. I did try it with pistol stitch but I wasn't pleased with the result and felt the French knots looked better.
For the final design I printed some of my dyed fabric with the wooden block that had inspired me. I used discharge paste so the design is quite subtle. Circles of the fabric were bonded to the background (I used misty fuse to keep it soft) and then secured with buttonhole around the edge. I used French knots again for the 'seeds' around the circle and used a few long stitches to give the impression of the stalks. The stems were whipped backstitch.
I've loved doing all three of these designs and have a head full of more!
Subscribe to:
Posts (Atom)