Pages

Showing posts with label dyed fabric. Show all posts

Tuesday, 8 January 2019

Finishing up 2018!

Before I begin to talk about 2019 I must finish updating you about 2018!

I had a quick check through to see where I was on the blog and the first thing I realised was I had not mentioned November and December Journal Quilts.

For November the colour palette was violet/purple so I started my log cabin with a square of fabric hand printed with a purple swirl pattern and added strips of various shades of purple from my fabric stash, all dyed by myself.   I made the block on point to make it a bit different.

The completed block was then free machine quilted with a swirl pattern to reflect the centre print and finally bound with more of the swirl fabric.


December saw a return to the beginning of the colour wheel so had to be purple and red so starting with a larger central square gelli printed with red, I added strips in slightly different width of purple and included so red piping as I went.  Once the quilt was free machine quilted in a 'greek key' type pattern, I bound it with red gelli printed fabric.


This is the first year I planned each month in advance and stuck to the plan!   I'm really pleased with the end result, particularly the way they look when stacked up .....


..... and as a group they look good too!


Monday, 29 October 2018

October Journal Quilt

Had a busy few weeks with many things getting in the way of me creating and keeping up to date!

I did manage to get my October Journal Quilt made but somehow never got around to posting about it so now is my chance to do so.

October meant that I had reached the blue/violet section on the colour wheel so for this I decided to do a log cabin that had a chequered effect.  I didn't really think it through to0 much so although I can promise you that the construction was very much a log cabin, the end result doesn't really look like it!


I free machine quilted the flower design using stitch and tear as I was frightened of not having an all over pattern.  It worked very well until I had to remove the paper and found that at the centres of the flowers the stitching was too dense to completely remove it.  Great learning curve for me and thank goodness it was on something that I don't plan to exhibit!

Only two more JQs to go for this year which has already got me thinking about what to do next year .....


Wednesday, 3 October 2018

Fabric Book


This is my latest creation, one I've been working on for some weeks but decided to wait until it was finished before I revealed it.

I've been drawn to hand made fabric books for some time so felt it was time I made one myself and as the sea and beaches play such a large part in in life, it was a no-brainer when it came to the subject.

So, what's inside .......


Starting with the sea, I layered various fabrics, lace and trimmings which were hand stitched to a background of indigo dyed fabric (fabric I have had for  over 25 years!).  I added some hand stitching including French knots, buttonhole stitch and straight stitch before oversewing around the edges.


For this seashells page, I starting by cutting my own rubber stamp with two different sized shells.  I've used shells in other pieces of work and have looked before for a rubber stamp but as I could never find one, I thought cutting my own would mean I'll have it to use in the future.

The shells were printed on to a piece of my own dyed  yellow fabric and the outlines were hand stitched with backstitch.   The text was printed on to tape and attached with running stitch.  Pieces of shell were added to finish before the edges were again oversewn.


I just love beach huts so they had to be included.   I always take photos of beach huts when I see them so this one, taken at Avon Beach, was printed on to fabric and applied to a background of blue and yellow fabric which I had dyed.   Simple straight stitches were added to the 'sand' to represent the grass that grows on the beach and a couple of seagulls were added to the sky.  Again, as with every page, the edges were oversewn.


No trip to the beach is complete without building a sandcastle!   We've made many when having a day on the beach with the grandchildren so they had to feature in this book.

This was quite simple - backstitched outlines on a piece of hand dyed fabric.


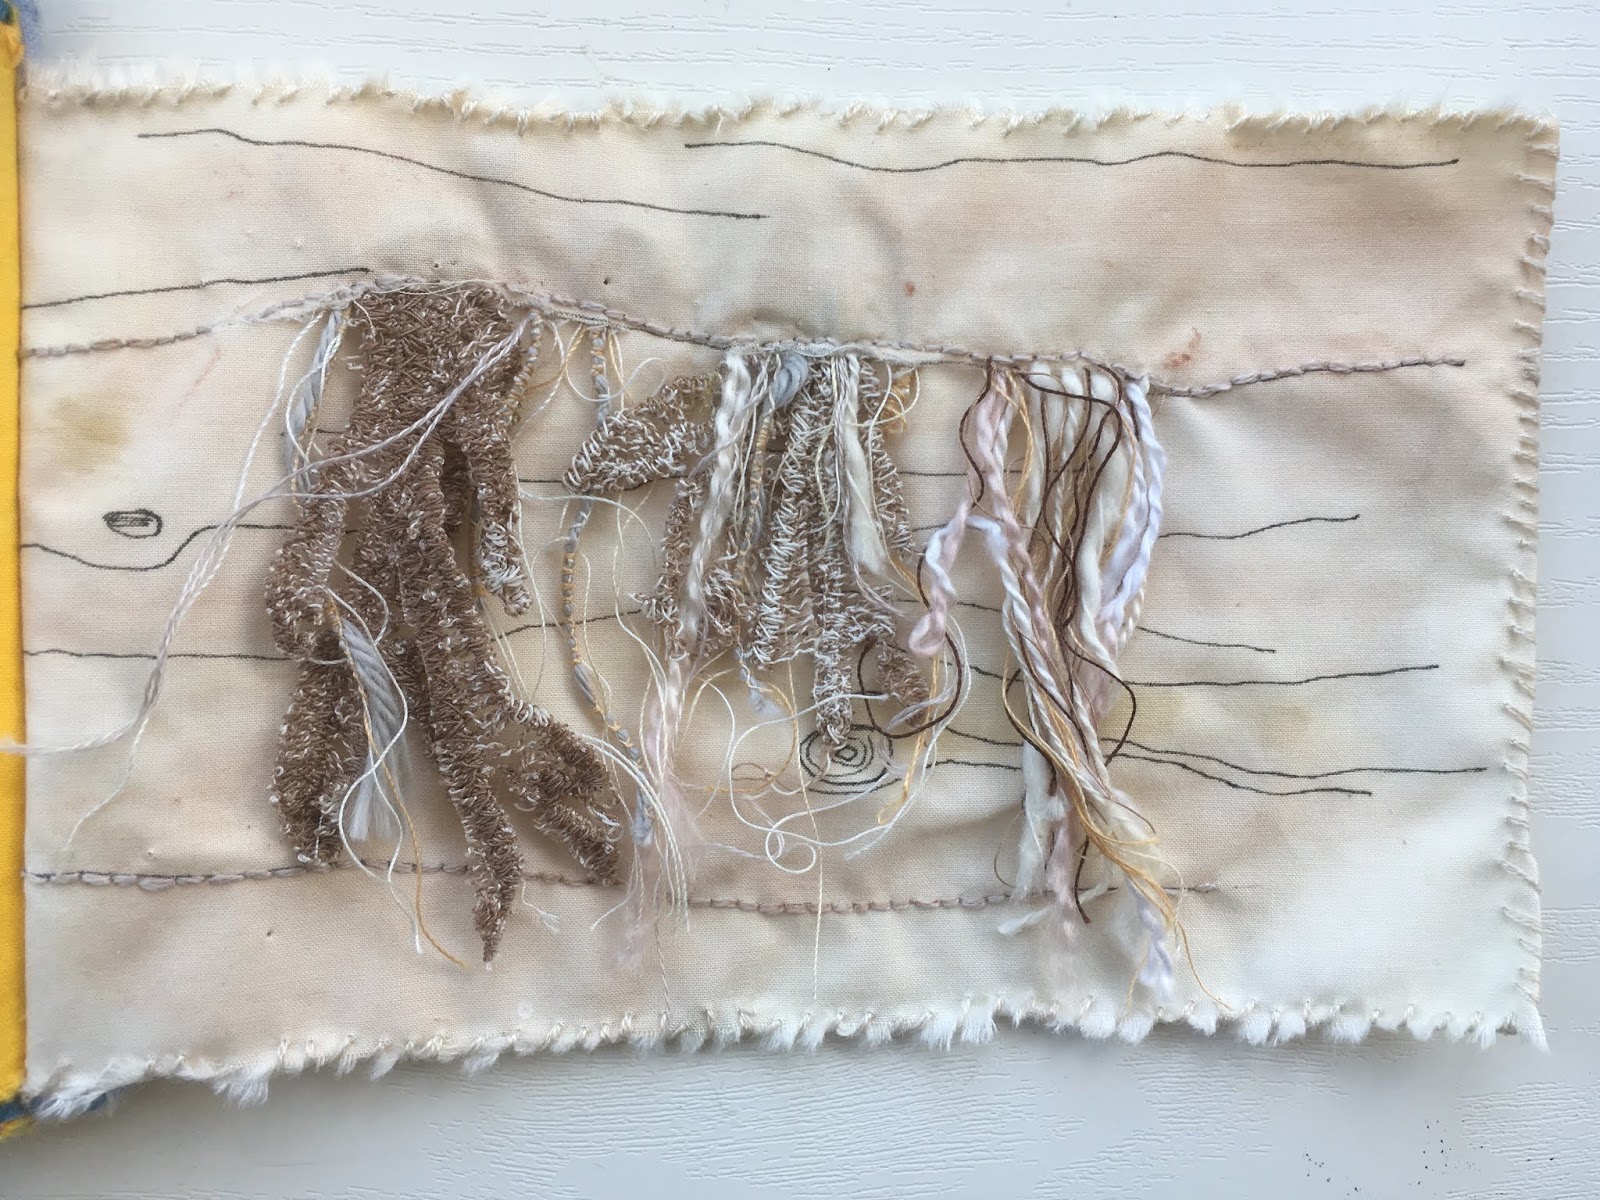
Some years ago, I took a photo of a wooden groyne at Littlehampton in which seaweed had become trapped and then been bleached by the sun.   At the time I was very taken with the image and felt sure there was something creative I could do with it and finally it's happened. 

I started with a piece of cream fabric which I coloured in various ways including paint and water soluble crayons and pencils and adding the timber grain lines with a drawing pen,   I wanted the colour to be quite subtle which is why it looks as though the fabric has not been coloured!

I created a piece of seaweed by machine embroidery on soluble fabric but as it was a bit stiff I cut in to it to roughen it up a bit.  This was stitched into a slit in the fabric along with various lengths of different threads.  A line of backstitch was added along the bottom for balance.


The final fishy page has the outline of a fish in stem stitch with lines of sequins had stitched in rows. Lines of backstitch and fly stitch added detail to the fins and tail and feather stitched was used for the seaweed.   The text was backstitch around the edge.

When I came to the cover I used up scraps and off cuts of blue and yellow fabric that I had used for the pages.  I used bondaweb to secure the pieces and then added running stitch and lines of straight stitch to secure some of the edges.   I put a piece of light fusible Vilene to give the cover a bit more weight and then buttonholed around the edge of the cover and lining.

The pages and cover were secured with stitching down the spine.


Hopefully this will be the first of many fabric books!

Sunday, 23 September 2018

Other creations this month

I was a bit late with my Journal Quilt this month.  It was done within September but for the past few years I have been ahead of myself so I felt quite guilty that it wasn't done until the middle of the month.

This month I reached the "blue" month so decided to have something linked to the sea for the gelli printing.   I've made my own print blocks with polystyrene in the past so used this method to create some texture on the plate inspired by waves and using fabric paints, printed some of my dyed blue fabric.  I used two or three different shades of blue fabric paint but once again I found that you don't get the same definition as you do when using acrylic paint.  The results were good though for the task in hand.


For the Log Cabin part of the quilt, I've again used the Courthouse Steps as the basis of the design with a bit of a twist.   For three of the sides I used different shades of my own dyed blue fabric and then the gelli printed fabric for the fourth side and the binding.

For the quilting I used a stitch on my machine which gives the appearance of waves going up and down.


It's time for a change of season so my thoughts turned to ideas for an Autumn hoop for my mantelpiece display.   I love the colours of Autumn - I always think it is because I was an Autumn baby!- so I knew it had to be something to reflect the colours.

My choice was a simple maple leaf (another favourite, particularly at Autumn) and luckily I found just the pattern I needed on the internet.  I've gone back to cross stitch after many years absence and as I enjoyed it so much, I think there will be more.  So therapeutic!


The display in coming together but I want to add some sort of foliage in a vase so am still thinking about that.   The other hoop and owls are from a Craftpod box I did last year when I began my seasonal project.


The garland of Autumn leaves is another pattern from Attic24 which I made using the ends of yarn left over from her Woodland Blanket which I made earlier this year.


Saturday, 11 August 2018

Journal Quilt - Green and Blue

For the August Journal Quilt, I used green and blue fabrics from my stash of hand dyed fabrics.   Some I printed on the gelli plate using a stencil which had some text.   It was one of those occasions when one print was enough - the colours and the print looked so good I was reluctant to do further prints in case it was ruined.

For the log cabin part, I started with a Courthouse Steps design which had a larger than normal centre as I then cut the finished panel into four, rearranged the pieces so the centres were in the corners and then reassembled them.


The centre 'cross', which was the gelli printed fabric, was machine quilted along with 'in the ditch' for the other rounds.   For a change I bound each edge separately so I could have different colours.


I know it doesn't show in the photo, but the sizing of this quilt went horribly wrong!   I started by drawing it out on paper, cutting it up to see what it looked like and to help with the colour placing.  I then diligently added all the seam allowances, including those needed for the reassembling, but somehow or other it did not work out!    I managed to tweak it as far as I could but the long side is more 8.1/2" instead of 9".   Never mind, if at any stage they go for exhibition, I won't include this one which after all has been said, is one of my favourites this year.

Friday, 6 July 2018

Embroidered Dandelions

My love for embroidery still continues and for the past few weeks I've been working on a series of embroidered hoops based on a dandelion design.

The first one was inspired by a wooden block I have which features a dandelion clock.  The ends look just like fly stitches so I felt it cried out to be an embroidery.  I decided to do this on a navy blue background so I could use cream thread so the seed head looked more realistic.


I then moved on to design number two which incorporated fabric in a side panel and one of the dandelion heads.  I chose yellow to reflect the yellow of the dandelion flower.

For this seed head I used French knots at the end of a long stitch.  I did try it with pistol stitch but I wasn't pleased with the result and felt the French knots looked better.


For the final design I printed some of my dyed fabric with the wooden block that had inspired me.  I used discharge paste so the design is quite subtle.  Circles of the fabric were bonded to the background (I used misty fuse to keep it soft) and then secured with buttonhole around the edge.  I used French knots again for the 'seeds' around the circle and used a few long stitches to give the impression of the stalks.   The stems were whipped backstitch.


I've loved doing all three of these designs and have a head full of more!

What I did with snow dyed fabric!

You may recall that earlier this year we were blessed with snow, the first time for some years and as a committed dyer, I did some snow dyeing.

At long last I've used the fabric I produced to make some mats and a tablecloth for our caravan.  The designs were simple so I could get them done quickly and out of the fabric from this year's dyeing I made mats for the table and coffee table.


These two used all the fabric I had so delving in to my stash I found some more fabric that I did some years ago using either snow or ice - I can't remember which!

The colours are much deeper than this year's batch so I don't know what I did that was different. 

For the tablecloth, I used a wooden block to print a leaf design using discharge paste.  I had intended to do this with the first two mats but I forgot to do it!

It was a great exercise as it showed me how different coloured dyes react - some of the squares only had a very feint print whereas others were very clear.   I haven't done much work with discharge paste but I was so pleased with this work that I'll definitely do more again soon.


This month's Journal Quilt

For this month's green quilt I printed some of the fabric using skeleton leaves on the gelli plate.  The results were not as clear as I really wanted but that's the fun of a gelli plate - you never can tell how it will come out!

However, once the fabrics were cut the results were not as bad as I thought.

For the log cabin bit, I started with a uneven corner shape and then cut each of the strips into even widths as I added them.  Once complete, I quilted the strips of plain fabric with a leaf shape to tie in with the leaf prints.  It's a design I used last year on my March quilt and as I like it so much I will no doubt use it again.

When this part of the quilting was done I still felt it needed a bit more so I stitched in the ditch on all the strips.  I chuckled to myself as I did this as it doesn't seem that long ago I did the minimum amount of  quilting I could get away with whereas now I prefer as much as I can get away with!


When I was sorting out the quilts I've done so far this year, I noticed how good they looked in a stack, so good I had to take a photo!


Tuesday, 5 June 2018

Journal Quilt for June

Moving on from yellow, this month's JQ is yellow and green.

I started with a random pieced panel in the centre which was created using fused fabric which I bonded to a backing fabric and then cut to shape.  This was then bordered as a log cabin first with yellow which I then cut at angles before completing with a green border.


I was a bit worried about the raw edges on the centre panel so decided to machine quilt narrow lines and hope it was enough.

You may recall that one of the criteria for my quilts this year was to include some fabric that I have gelli printed.  Well, I got so carried away with creating the quilt that it was only when I had finished that I realised I hadn't used any printed fabric!   The border came to the rescue and I printed some fabric with fabric paint using my own foam shape blocks on the gelli plate.